🦋 Tin-can Cello: the curve of the neck, the straight of the neck
The parts of the tin-can cello's body (excluding the bucket and all of the components; just talking about the wooden body pictured above) are as follows, from top to bottom, with rough length of each part:
- Scroll and pegbox (9")
- Neck (the part the fingerboard attaches to) (13")
- Curve (11 ½")
- Dowel (27")
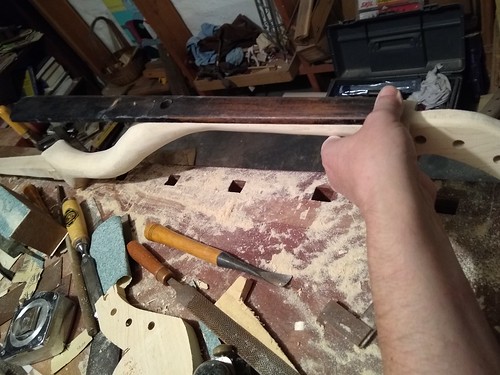
I have been working this afternoon on finalizing the curved portion of the neck. I noticed last night, running my hand along the curve, that there were some bulges and hollows -- this afternoon I've been endeavoring to smooth that out, using the rasp I bought from StewMac, which I must say is one of the nicest hand tools I've encountered. Then I went over it with 80-grit sandpaper, and it's looking nice. I think I'm about to the point with Scroll, Neck and Curve, that I can start sanding with finer grits.
The curve has been interesting because I have no template whatsoever for it. I layed out the position of the upper neck using the fingerboard as a reference, and then I layed out the curve based on what I thought would look nice and would be strong.
Getting the upper portion of the neck straight and flat has been a while coming. I did a bad job of roughing it out on the bandsaw; I did not tighten the table trunnions sufficiently before I started, and the table moved out of square slightly. So the surface of it was skew. I wasn't able to get much of anywhere squaring it with jointer plane, in part because the scroll rises above the plane of the neck (nonstandard) and in part because the wood is so hard it's just very difficult to plane. I ended up flattening the surface with rasp and coarse sandpaper, checking my progress as I went against the fingerboard that I'll be gluing on there; and it took a while. But I reckon it is right, now; when I lay the fingerboard on there it lies flat and I can sight straight along it to the point of the dowel. Next I will sand it with 100- and 120-grit, to prepare for gluing. I won't glue the fingerboard on until after I have fit the body into the bucket.

posted afternoon of Sunday, August 26th, 2018
➳ More posts about The Tin-can Cello
➳ More posts about Projects
|