|
|
Sunday, June 17th, 2018
I spent the past week in Long Branch at a instrument-making workshop taught by Jeff Menzies of Menzies Instruments, building a gourd banjolele -- a whole lot of fun watching the instrument take shape over the course of the week.
posted afternoon of June 17th, 2018: 1 response
➳ More posts about Woodworking
|  |
Wednesday, August 8th, 2018
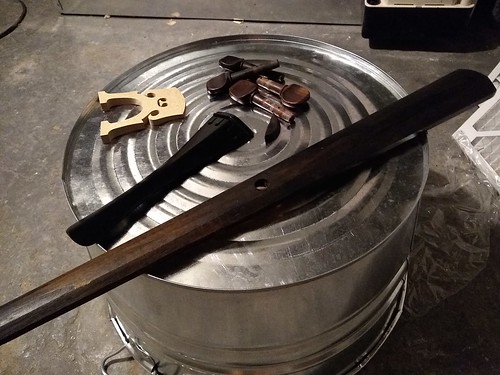
So here is the idea: to build a cello, using as resonating chamber a washtub + a bass drum head. The construction of it will be on the principle of a gourd banjo; but with curved nut, fingerboard, and bridge. I am using an 11-gallon steel washtub, 20" across at its widest point; splurged and ordered it from Amazon -- consider this circular form the lower part of a cello body. The position of the bridge will be near the top of the soundboard, meaning the neck will need to be a bit longer than the the fingerboard* -- unlike a cello, which has a longer body. So the spot where you're bowing is at the top of the circular soundboard (the soundboard, i.e., the bottom of the washtub), midway between the end of the fingerboard and the bridge. The drum head is clamped in to the back of the body, to enclose the resonating chamber; and I'll cut a soundhole in the side of the tub. The instrument is in effect a bowed banjo-cello, with no soundpost -- a baritone rebab. I've got my fingers crossed that it will sound like anything :). I find it encouraging that a few experimental taps at the soundboard made the bucket ring like a bell!
First step is of course to have the washtub and cello components in hand, so I can mark it all out on cardboard. Local violin dealer Mo Menzel has very graciously offered to sell me a broken cello cheap, to use for parts, and I'm hoping she'll sell me a good bridge as well. In the next week or so, will swing by Board and Beam in Fairfield to pick up a hard maple board for the neck.
posted evening of August 8th, 2018: 1 response
➳ More posts about Projects
|  |
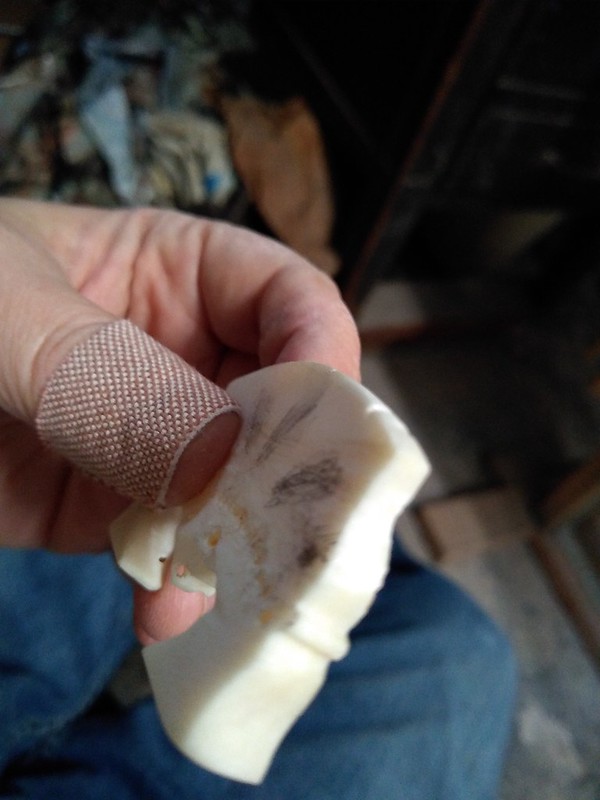
Sunday, August 12th, 2018
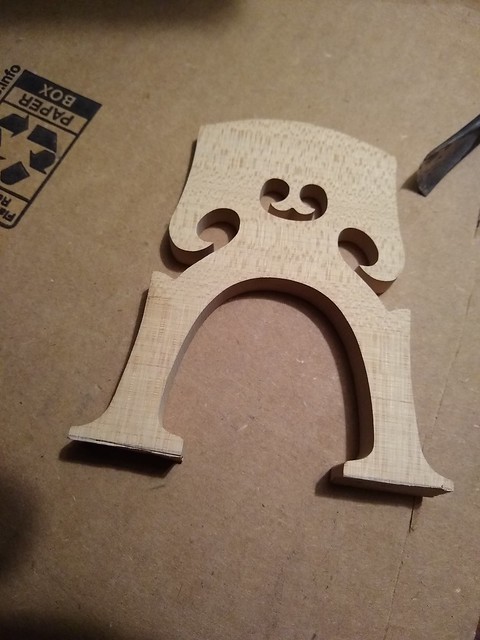
Two excellent resources for carving and setting up the bridge -- Fitting and Carving a New Cello Bridge at Triangle Strings lays it all out, Cello Bridge Carving at Jawmunji Fingerstyle Resources breaks down and simplifies a few
key points.
I bought a good quality Belgian-style bridge from Menzel and a template from Metropolitan. Won't do much work on it until the main work of building the instrument is done... I'm already starting to visualize where its contours will be.
. 
posted morning of August 12th, 2018: Respond
➳ More posts about The Tin-can Cello
|  |
|
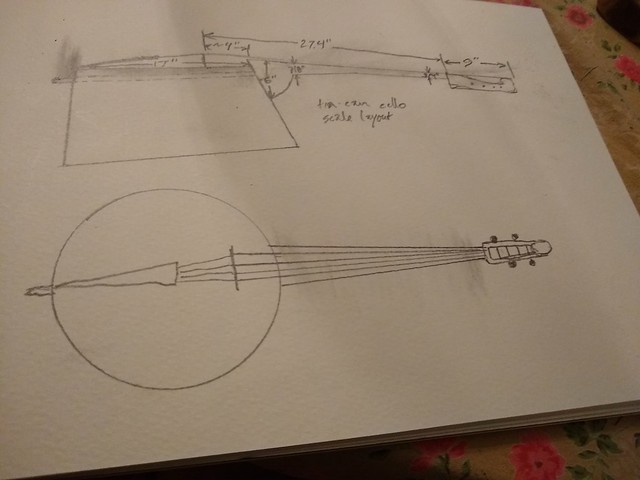
(Roughly to scale anyways). Some key measurements, as follows:
- Scale length (bridge to nut) 27.4"
- diameter of soundboard 17"
- bridge position to edge of soundboard ~4"
- length of peg box + scroll ~9"
- length of fingerboard 23 ⅜"
- height of tub 11"
- width of fingerboard at bridge end 2 ⅜"
I reckon the blank for the neck will need to be 10/4 hard maple, 6" wide*, 5' long. (Hope my bandsaw is up to the task! Derek is coming over in the near future to help with tuning it, and also to help with picking out wood...)
posted afternoon of August 12th, 2018: 7 responses
|  |
|
Work plan for building the Tin-can cello (this post is changing a bit, I'm just going to edit it inline; further edits in comments):
- Flatten bottom of neck: this will be the reference flat when cutting on the bandsaw. Plane entire length of board flat and straight. For reference, this is going to be parallel to the plane of the washtub's base. [note I never planed it flat, at all.]
- Mark up neck: draw outlines of the dowel and the neck on the board. Draw outline on the top of the board (i.e. opposite the side that was planed in step 1) and on one side. Use cardboard cut into shape of tub profile to determine where the dowel will go into the bucket.
- Cut around the outlines on bandsaw.
- Rough out dowel and neck. Finish dowel so it is straight and true. Mark up pegbox and scroll. Drill pilot holes for pegs.
- Mark entry for dowel on bucket. Cut open using angle grinder. Mark exit hole for dowel. Cut open.
- Fit dowel into bucket. True up heel.
- Finish shaping neck, carve pegbox and scroll. Attach nut and fingerboard to neck.
- Mount tailpiece; put A and C strings on, loose.
- Mark up and carve bridge.
- Set up cello.
posted evening of August 12th, 2018: 3 responses
| |
Tuesday, August 21st, 2018
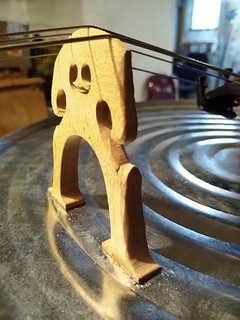
I've been fretting about carving the pegbox on my cello... Today I had an idea for how to hugely simplify the process. I can't swear it is a good idea, but I went ahead and acted on it. Won't know until setup time if it's a boon or a bust.
The lateral* pegbox
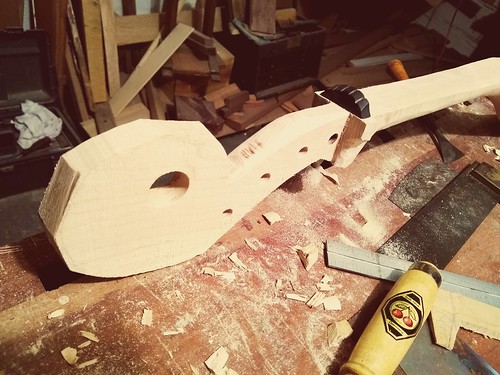
So the idea is, instead of having two ⅜" cheeks for the peg to enter and exit, with the string winding in the middle, there is just a central fin ¾" wide. Pegs enter from alternating sides; the string winds on the opposite side to where the peg enters.
 The good
It looks kind of cool; it's original; it's way simpler to make. Also: if I ever wanted to switch to 5 strings, easy to drill another peghole.
The bad
I'm not certain about the physics here. In a traditional pegbox, the stress on the string is in between two points of support; here, the stress will be supported on one side only. This may break the peg, I'm not sure how strong they are. We'll see! If I'm wrong and it does not work, I'll need to carve a new pegbox and scroll, and graft it onto the neck. (Or as Jeff points out, if the pegs don't work I could try using bass viol tuning machines as a fallback option.)
but
Here's why I'm sort of confident about the peg holding up: if the string is wound properly, the stress on the peg will be right next to where it emerges from the supporting wood. This seems like a pretty strong load-bearing point.
*(and note)
Not a huge amount of thought went into the nomenclature. If you've got a more descriptive adjective for this than "lateral", please let me know.
↻...done
posted evening of August 21st, 2018: 2 responses
|  |
Sunday, September 23rd, 2018
My shop time this weekend has been spent on putting the finishing touches on the neck of the Tin-can Cello. Since I last posted, in parallel with repairing the crack in the scroll, I've been putting stain on the different parts of the neck and buffing it out with steel wool-- I've been able to buff it to a very nice sheen. The pigments are pretty muted, with an antique look.
This weekend I was able to stain the scroll and put some coats of Tru-oil on. I will buff and sand the finish this week, and possibly put one more coat on.
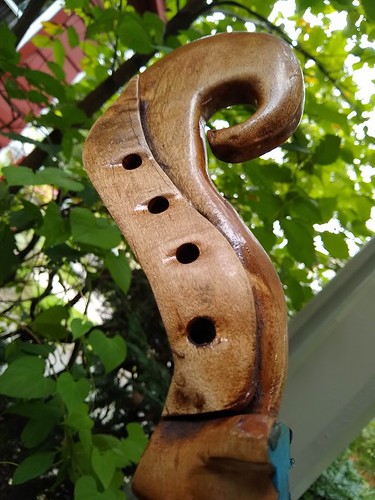
I'm naming him Chelliphant! Finishing steps

- A coat of thinned Tru-oil (about 1 part turpentine, 2 parts finish) over the entire neck, scroll and dowel. (This is the last we will think of the dowel.)
- After about an hour (finish will not be completely dry), buff out with cloth.
- After another hour, wipe with turpentine and buff out with steel wool. (At this point finishing is complete for the upper portion of the neck, which attaches to the fingerboard.) Allow to dry overnight.
- The next day, apply several coats of Tru-oil, allowing about 2 hours between coats. Here we are only finishing the lower, curved part of the neck, the scroll, and the back of the washtub.
- After the fifth or so coat is dry, buff out finish with turpentine and steel wool and cloth.
- After a day or more of drying, sand the finish to 400, 600, 1000 grit and wipe down once more with turpentine.
↻...done
posted afternoon of September 23rd, 2018: Respond
| |
|
The tools I have found the most useful in the course of building the Tin-can Cello:
- bandsaw. This project would have been just about unthinkable without a bandsaw.
- angle grinder. Has been an invaluable time-saver and has made a fair amount of shaping possible that I would never have started on otherwise.
- dragon rasp. Just a great, great hand tool.
- sanding blocks: Wow. In the course of my woodworking avocation to date, I don't believe I've ever glued sandpaper to wooden blocks. Certainly not the amount I'm doing in this project. It is a wonderful thing!
- scrapers (especially the french curve shape)
posted evening of September 23rd, 2018: 1 response
| |
Saturday, October 20th, 2018
I mean I'm sure I'll be doing bits of setup here and there for months. But for all intents and purposes. Here's what it sounds like... pardon the atrocious playing :), I've just now contacted a local cello teacher!
It's funny, because my original estimate for best-case when I might finish the cello was "end of September". Not bad considering! This whole project has taken like 4 months from conception to execution.
 Update from Sunday morning: wow! The instrument stayed nearly in tune overnight! First time that has happened. A couple of things to be done this morning: I forgot to put parchment on the bridge for the A and D strings; I want to re-drill the string holes in the pegs; some of the pegs need a little more peg dope. I ordered fine tuners.
posted afternoon of October 20th, 2018: Respond
| |
Sunday, October 28th, 2018
I am following (loosely) the plan David Courtney writes about at Chandrakantha.com for setting up a dilruba bridge.
The idea is to keep the rigidity of the shape but open up its structure, to reduce mass. I'll cut the marked areas away using a combination of drill press and fret saw (the latter of which I'll need to find, and acquire a jeweler's blade).
posted morning of October 28th, 2018: Respond
| More posts about Luthery
Archives  | |
|
Drop me a line! or, sign my Guestbook.
•
Check out Ellen's writing at Patch.com.
| |