|
|
Friday, October 12th, 2018

posted evening of October 12th, 2018: Respond
➳ More posts about Wallpaper
|  |
|
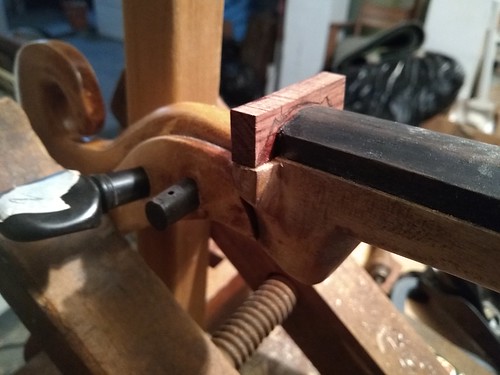
Mike came over this evening and helped me with starting setup of my tin-can cello. But it quickly became apparent that the nut that's on the cello now (taken from the same salvage cello that the fingerboard came from) is not going to work. The action is too low, for one thing, and it turns out my lateral peg-box is going to require a special shape of nut, to keep the C string in place. I am going to carve it out of a block of cocobolo (which is what I have on hand, I think it will work in place of ebony), taking the tutorial Making a Violin Nut, by Matthew Noykos, as my point of departure.
posted evening of October 12th, 2018: Respond
➳ More posts about The Tin-can Cello
|  |
Tuesday, October 9th, 2018
A FB friend hits the nail on the head: How quickly we went from “I Believe Christine Blasey Ford†to “Will This Help Or Hurt Us in the Midterms?â€!
posted evening of October 9th, 2018: Respond
|  |
Thursday, September 27th, 2018
So I'm going over to Derek's shop on Sunday, to see if I can use his fifth-string peghole taper on my cello... If not I'll bite the bullet and buy a taper from StewMac -- I have a hunch that it will not, and I'll have to. (Update, bought a taper from eBay. Setup is not going to happen for another 3 to 6 weeks.) I made a couple of minor tweaks to the body this evening, bolting on a block that was loose and fixing the forward brace in place with a screw, and I closed the back. I put thick masking tape on the bucket where the tail spike emerges, to mask any rough edges that might wear at the tailcord.
posted evening of September 27th, 2018: Respond
➳ More posts about Projects
| |
Wednesday, September 26th, 2018
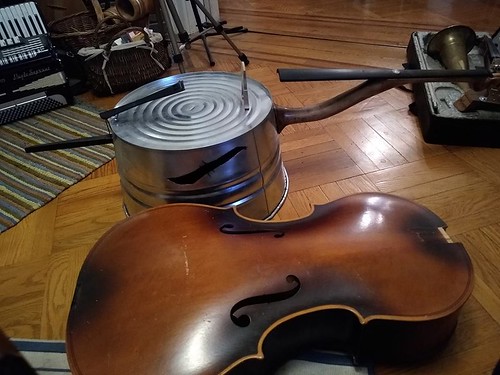
It is a nice confirmation to get: this evening I thought to lay the tin-can cello next to the body of the Kay cello which I scavenged its fingerboard and neck measurements from -- the bottom and top of the cello body line up exactly with the bottom of the washtub and the end of the curved portion of the neck, and the bridge position on the tub lines up with the center of the f-holes on the cello. What's nice is that I did not use this cello body for measurements or as a story stick, I calculated all the scale numbers based on the washtub dimensions. But I went into this (before I had started working out dimensions at all) with the image of the washtub as the lower ⅝ or so of a cello's body, the curved portion of the neck making up the upper part of the body -- it looks like that's right on.
Also -- confirmed that the D string (which winds on the fourth peg, furthest distance from the base) will reach from the tailpiece to the peg.
posted evening of September 26th, 2018: Respond
| |
Monday, September 24th, 2018
I glued the fingerboard onto the cello neck this evening, which has a feeling of finality to it -- really all that's left now is to put the strings on!
 
posted evening of September 24th, 2018: Respond
|  |
Sunday, September 23rd, 2018
The tools I have found the most useful in the course of building the Tin-can Cello:
- bandsaw. This project would have been just about unthinkable without a bandsaw.
- angle grinder. Has been an invaluable time-saver and has made a fair amount of shaping possible that I would never have started on otherwise.
- dragon rasp. Just a great, great hand tool.
- sanding blocks: Wow. In the course of my woodworking avocation to date, I don't believe I've ever glued sandpaper to wooden blocks. Certainly not the amount I'm doing in this project. It is a wonderful thing!
- scrapers (especially the french curve shape)
posted evening of September 23rd, 2018: 1 response
➳ More posts about Luthery
|  |
|
My shop time this weekend has been spent on putting the finishing touches on the neck of the Tin-can Cello. Since I last posted, in parallel with repairing the crack in the scroll, I've been putting stain on the different parts of the neck and buffing it out with steel wool-- I've been able to buff it to a very nice sheen. The pigments are pretty muted, with an antique look.
This weekend I was able to stain the scroll and put some coats of Tru-oil on. I will buff and sand the finish this week, and possibly put one more coat on.
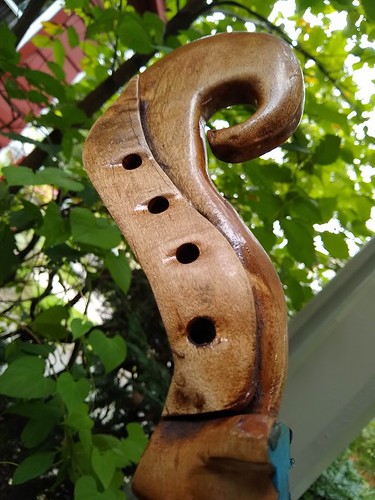
I'm naming him Chelliphant! Finishing steps

- A coat of thinned Tru-oil (about 1 part turpentine, 2 parts finish) over the entire neck, scroll and dowel. (This is the last we will think of the dowel.)
- After about an hour (finish will not be completely dry), buff out with cloth.
- After another hour, wipe with turpentine and buff out with steel wool. (At this point finishing is complete for the upper portion of the neck, which attaches to the fingerboard.) Allow to dry overnight.
- The next day, apply several coats of Tru-oil, allowing about 2 hours between coats. Here we are only finishing the lower, curved part of the neck, the scroll, and the back of the washtub.
- After the fifth or so coat is dry, buff out finish with turpentine and steel wool and cloth.
- After a day or more of drying, sand the finish to 400, 600, 1000 grit and wipe down once more with turpentine.
↻...done
posted afternoon of September 23rd, 2018: Respond
➳ More posts about Woodworking
| |
Sunday, September 16th, 2018
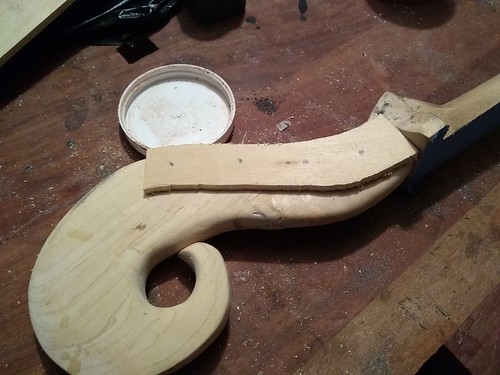
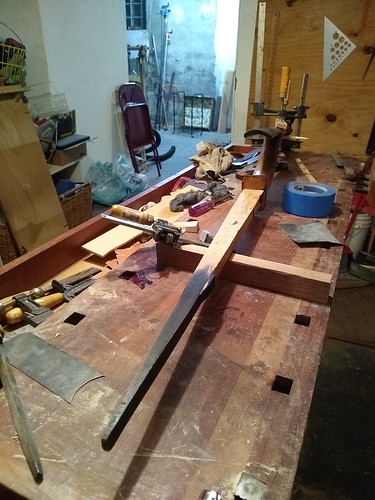
I am planning out a fix for the cracked scroll. My idea is to cut out two ¼" thick maple patches to the pattern I've roughed out above; I will glue them onto the sides of the pegbox and redrill the pegholes as I've marked -- these points are midway between the existing holes. This will significantly strengthen the pegbox and make a better instrument. The trick is going to be getting the mating surfaces perfectly flat.
posted afternoon of September 16th, 2018: 1 response
|  |
|
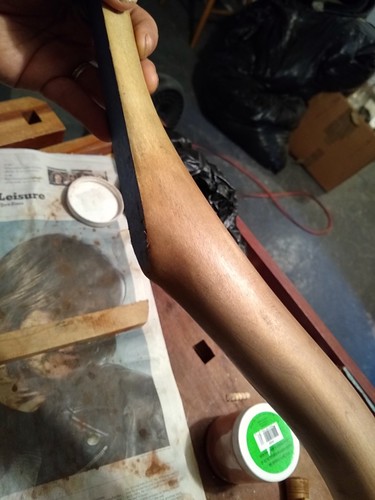
I've started the process of coloring the cello's neck. Holding off on the scroll until the repair is finished...
I'm taken aback by what a shiny, smooth "finished" surface I can get by buffing out the stain. The stain I'm using is made by mixing tea and pigment dissolved in turpentine -- apply by rubbing on with a cloth, then rubbing off the excess. Before it has fully dried, buff with steel wool. After it has dried, sand with 400 grit, and buff again with steel wool and cloth.
The curved part of the neck has varying depth of color; during the staining process I noticed scratches in a couple of places that I had missed when sanding the neck, and went back and sanded them out, removing stain. (There are also scratches that I left.) It looks surprisingly ok... I am thinking the finish will be a coat of thinned Tru-oil and then a coat of un-thinned Tru-oil, and maybe further coats for the lower portion of the neck and the scroll. Buffing with steel wool and cloth.
posted morning of September 16th, 2018: Respond
| Previous posts
Archives  | |
|
Drop me a line! or, sign my Guestbook.
•
Check out Ellen's writing at Patch.com.
| |